Chapter 2: Scaling with YugabyteDB
YugaPlus - Time to Scale
As days went by, the YugaPlus streaming service welcomed thousands of new users, all continuously enjoying their movies, series, and sport events. Soon, the team faced a critical issue: the PostgreSQL database server was nearing its storage and compute capacity limits. Considering an upgrade to a larger instance would offer more storage and CPUs, but it also meant potential downtime during migration and the risk of hitting capacity limits again in the future.
Eventually, the decision was made to address these scalability challenges by transitioning to a multi-node YugabyteDB cluster, capable of scaling both vertically and horizontally as needed...
In this chapter, you'll learn how to do the following:
- Start a YugabyteDB cluster with the yugabyted tool.
- Use the YugabyteDB UI to monitor the state of the cluster.
- Scale the cluster by adding additional nodes.
- Leverage PostgreSQL compatibility by switching the application from PostgreSQL to YugabyteDB without any code changes.
Prerequisites
You need to complete Chapter 1 of the tutorial before proceeding to this one.
Start YugabyteDB
YugabyteDB offers various deployment options, including bare metal, containerization, or as a fully-managed service. In this tutorial, you'll use the yugabyted tool deploying a YugabyteDB cluster in a containerized environment.
To begin, start a single-node YugabyteDB cluster in Docker:
-
Create a directory to serve as the volume for the YugabyteDB nodes:
rm -r ~/yugabyte-volume mkdir ~/yugabyte-volume -
Pull the latest YugabyteDB docker image:
docker rmi yugabytedb/yugabyte:latest docker pull yugabytedb/yugabyte:latest -
Start the first database node:
docker run -d --name yugabytedb-node1 --net yugaplus-network \
    -p 15433:15433 -p 5433:5433 \
    -v ~/yugabyte-volume/node1:/home/yugabyte/yb_data --restart unless-stopped \
    yugabytedb/yugabyte:latest \
    bin/yugabyted start --base_dir=/home/yugabyte/yb_data --background=false
Default ports
The command pulls the latest Docker image of YugabyteDB, starts the container, and employs the yugabyted tool to launch a database node. The container makes the following ports available to your host operating system:
15433- for the YugabyteDB monitoring UI.5433- serves as the database port to which your client applications connect. This port is associated with the PostgreSQL server/postmaster process, which manages client connections and initiates new backend processes.
For a complete list of ports, refer to the default ports documentation.
Next, open a database connection and run a few SQL requests:
-
Wait for the node to finish the initialization and connect to the container opening a database connection with the ysqlsh command-line tool:
while ! docker exec -it yugabytedb-node1 postgres/bin/pg_isready -U yugabyte -h yugabytedb-node1; do sleep 1; done docker exec -it yugabytedb-node1 bin/ysqlsh -h yugabytedb-node1 -
Run the
\dcommand making sure the database has no relations:\d -
Execute the
yb_servers()database function to see the state of the cluster:select * from yb_servers();The output should be as follows:
host | port | num_connections | node_type | cloud | region | zone | public_ip | uuid ------------+------+-----------------+-----------+--------+-------------+-------+------------+---------------------------------- 172.20.0.3 | 5433 | 0 | primary | cloud1 | datacenter1 | rack1 | 172.20.0.3 | da90c891356e4c6faf1437cb86d4b782 (1 row) -
Lastly, close the database session and exit the container:
\q
Explore YugabyteDB UI
Starting a node with the yugabyted tool also activates a YugabyteDB UI process, accessible on port 15433. To explore various cluster metrics and parameters, connect to the UI from your browser at http://localhost:15433/.
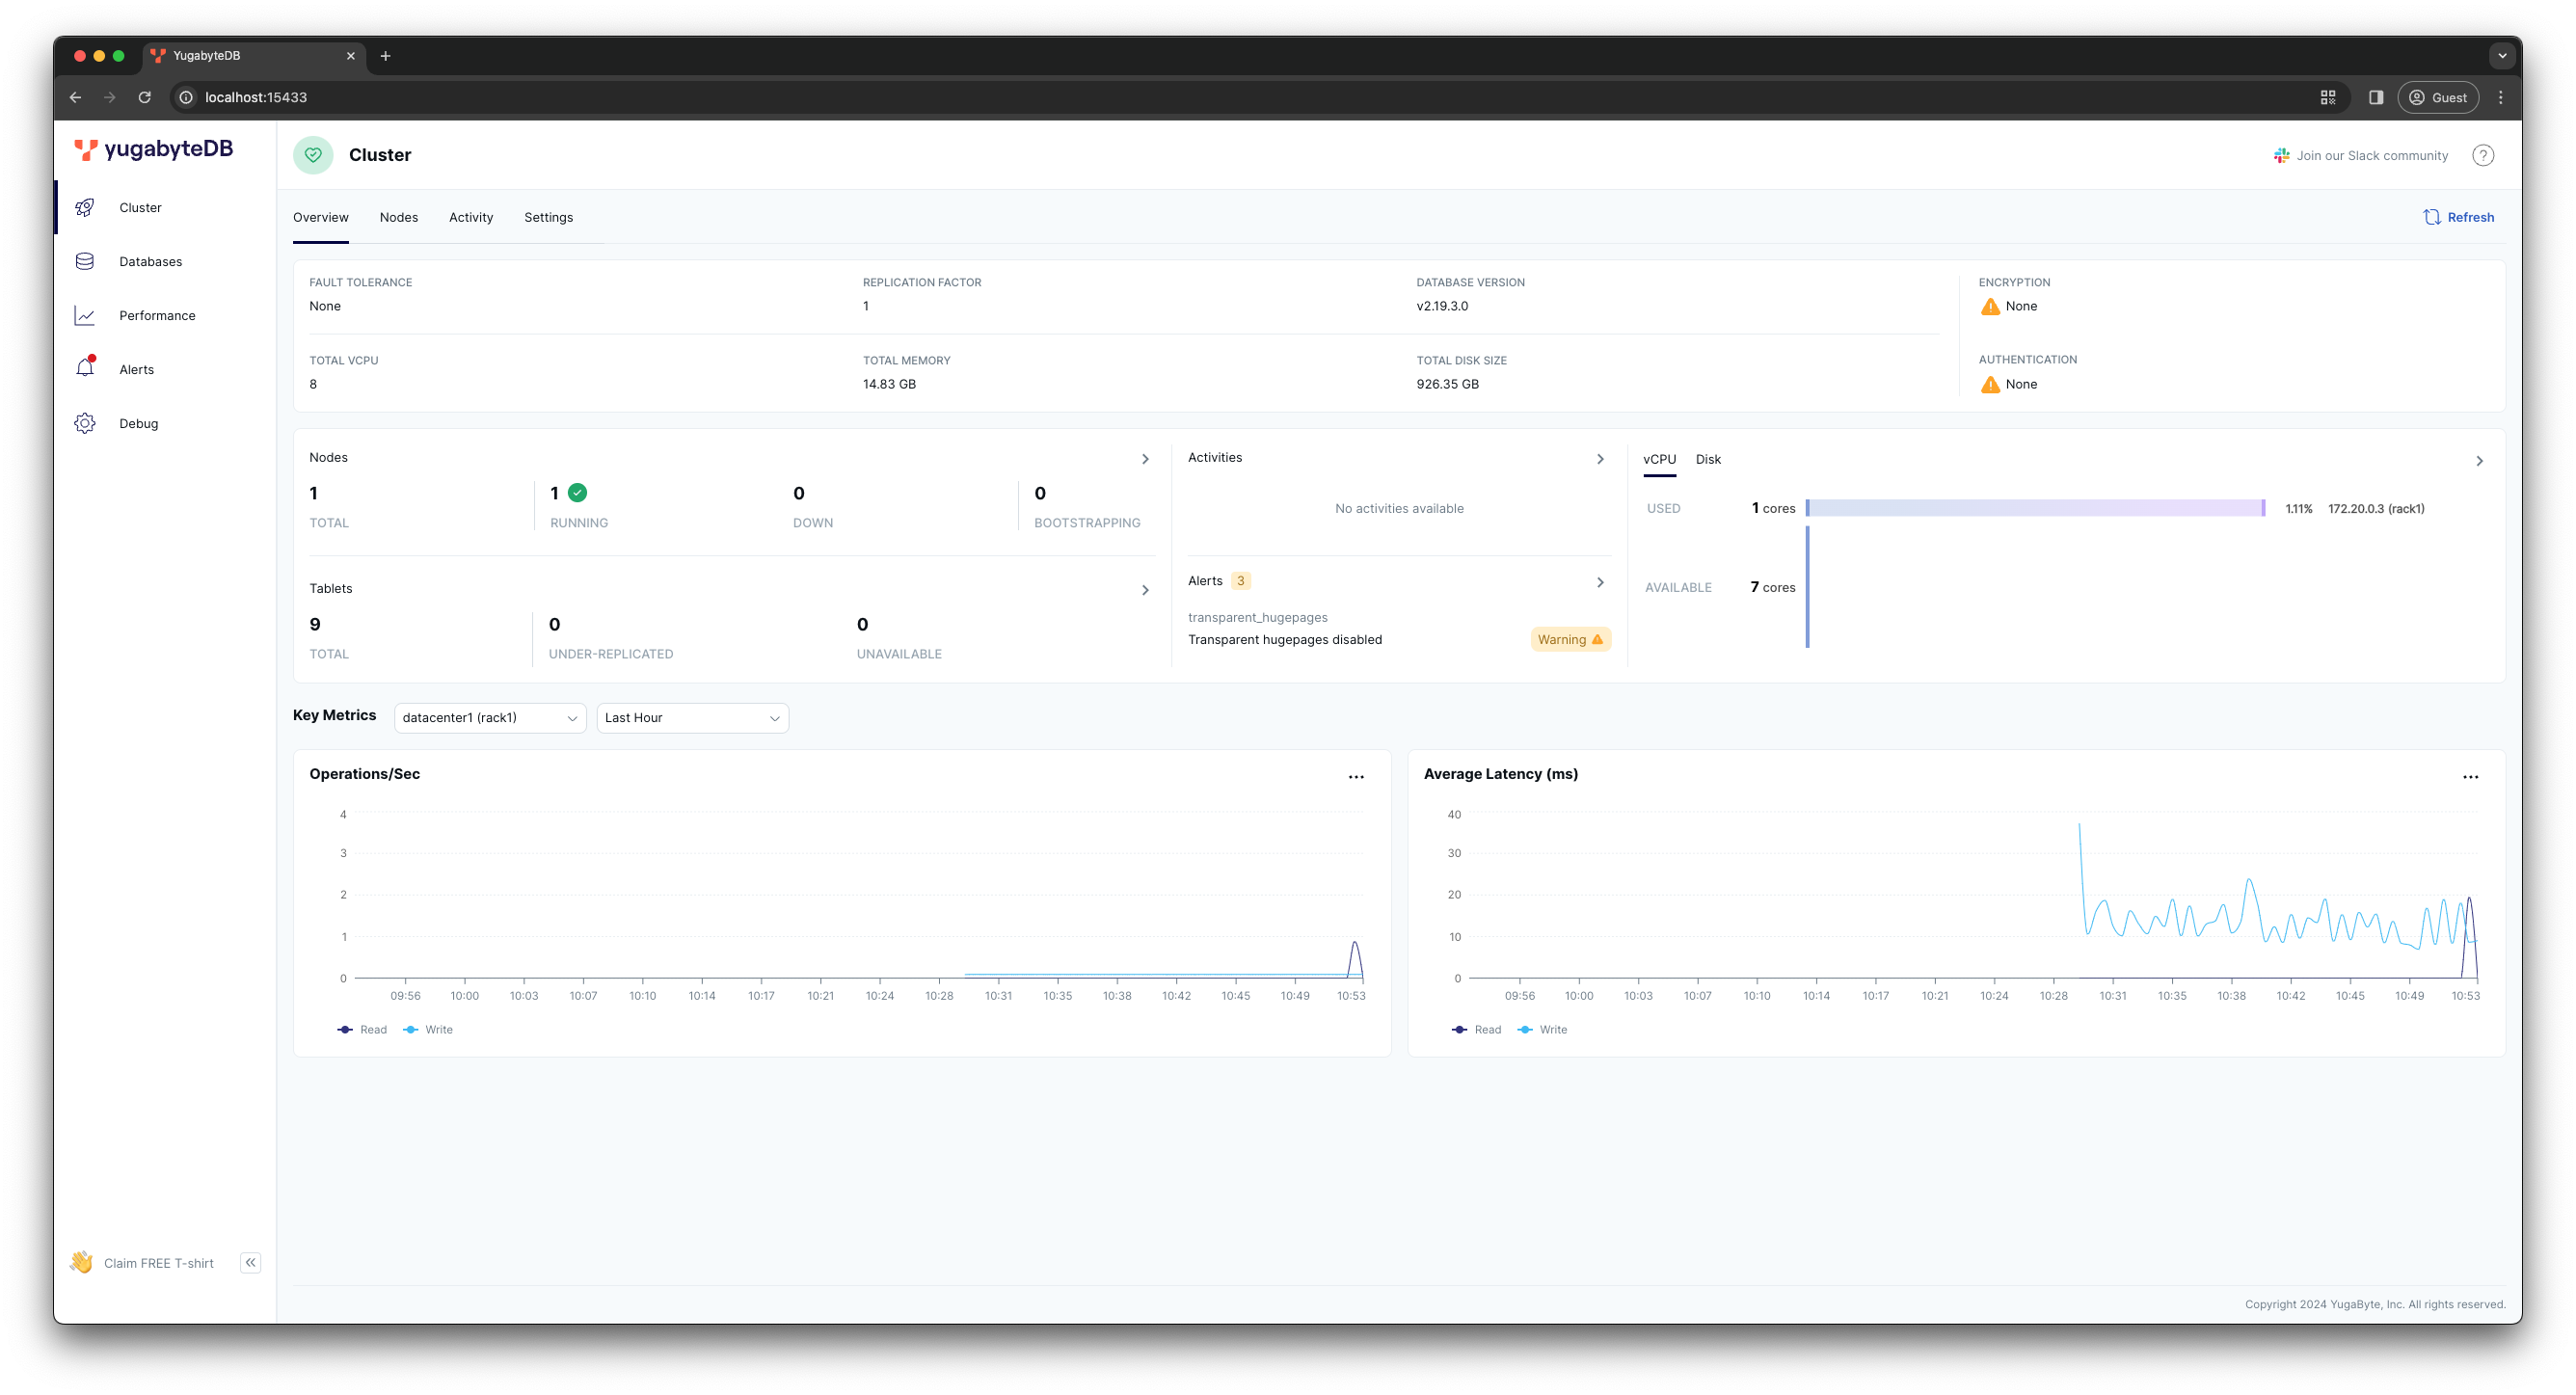
Currently, the dashboard indicates that the cluster has only one YugabyteDB node, with the replication factor set to 1. This setup means your YugabyteDB database instance, at this point, isn't significantly different from the PostgreSQL container started in Chapter 1. However, by adding more nodes to the cluster, you can transform YugabyteDB into a fully distributed and fault-tolerant database.
Scale the cluster
Use the yugabyted tool to scale the cluster by adding two more nodes:
-
Start the second node:
docker run -d --name yugabytedb-node2 --net yugaplus-network \ -p 15434:15433 -p 5434:5433 \ -v ~/yugabyte-volume/node2:/home/yugabyte/yb_data --restart unless-stopped \ yugabytedb/yugabyte:latest \ bin/yugabyted start --join=yugabytedb-node1 --base_dir=/home/yugabyte/yb_data --background=false -
Start the third node:
docker run -d --name yugabytedb-node3 --net yugaplus-network \
    -p 15435:15433 -p 5435:5433 \
    -v ~/yugabyte-volume/node3:/home/yugabyte/yb_data --restart unless-stopped \
    yugabytedb/yugabyte:latest \
    bin/yugabyted start --join=yugabytedb-node1 --base_dir=/home/yugabyte/yb_data --background=false
Both nodes join the cluster by connecting to the first node, whose address is specified in the --join=yugabytedb-node1 parameter. Also, each node has a unique container name and its own sub-folder under the volume directory, specified with -v ~/yugabyte-volume/nodeN.
Run this command, to confirm that all nodes have discovered each other and formed a 3-node cluster:
docker exec -it yugabytedb-node1 bin/ysqlsh -h yugabytedb-node1 \
     -c 'select * from yb_servers()'
The output should be as follows:
    host    | port | num_connections | node_type | cloud  |   region    | zone  | public_ip  |               uuid
------------+------+-----------------+-----------+--------+-------------+-------+------------+----------------------------------
 172.20.0.5 | 5433 |               0 | primary   | cloud1 | datacenter1 | rack1 | 172.20.0.5 | 08d124800a104631be6d0e7674d59bb4
 172.20.0.4 | 5433 |               0 | primary   | cloud1 | datacenter1 | rack1 | 172.20.0.4 | ae70b9459e4c4807993c2def8a55cf0e
 172.20.0.3 | 5433 |               0 | primary   | cloud1 | datacenter1 | rack1 | 172.20.0.3 | da90c891356e4c6faf1437cb86d4b782
(3 rows)
Next, refresh the YugabyteDB UI main dashboard:
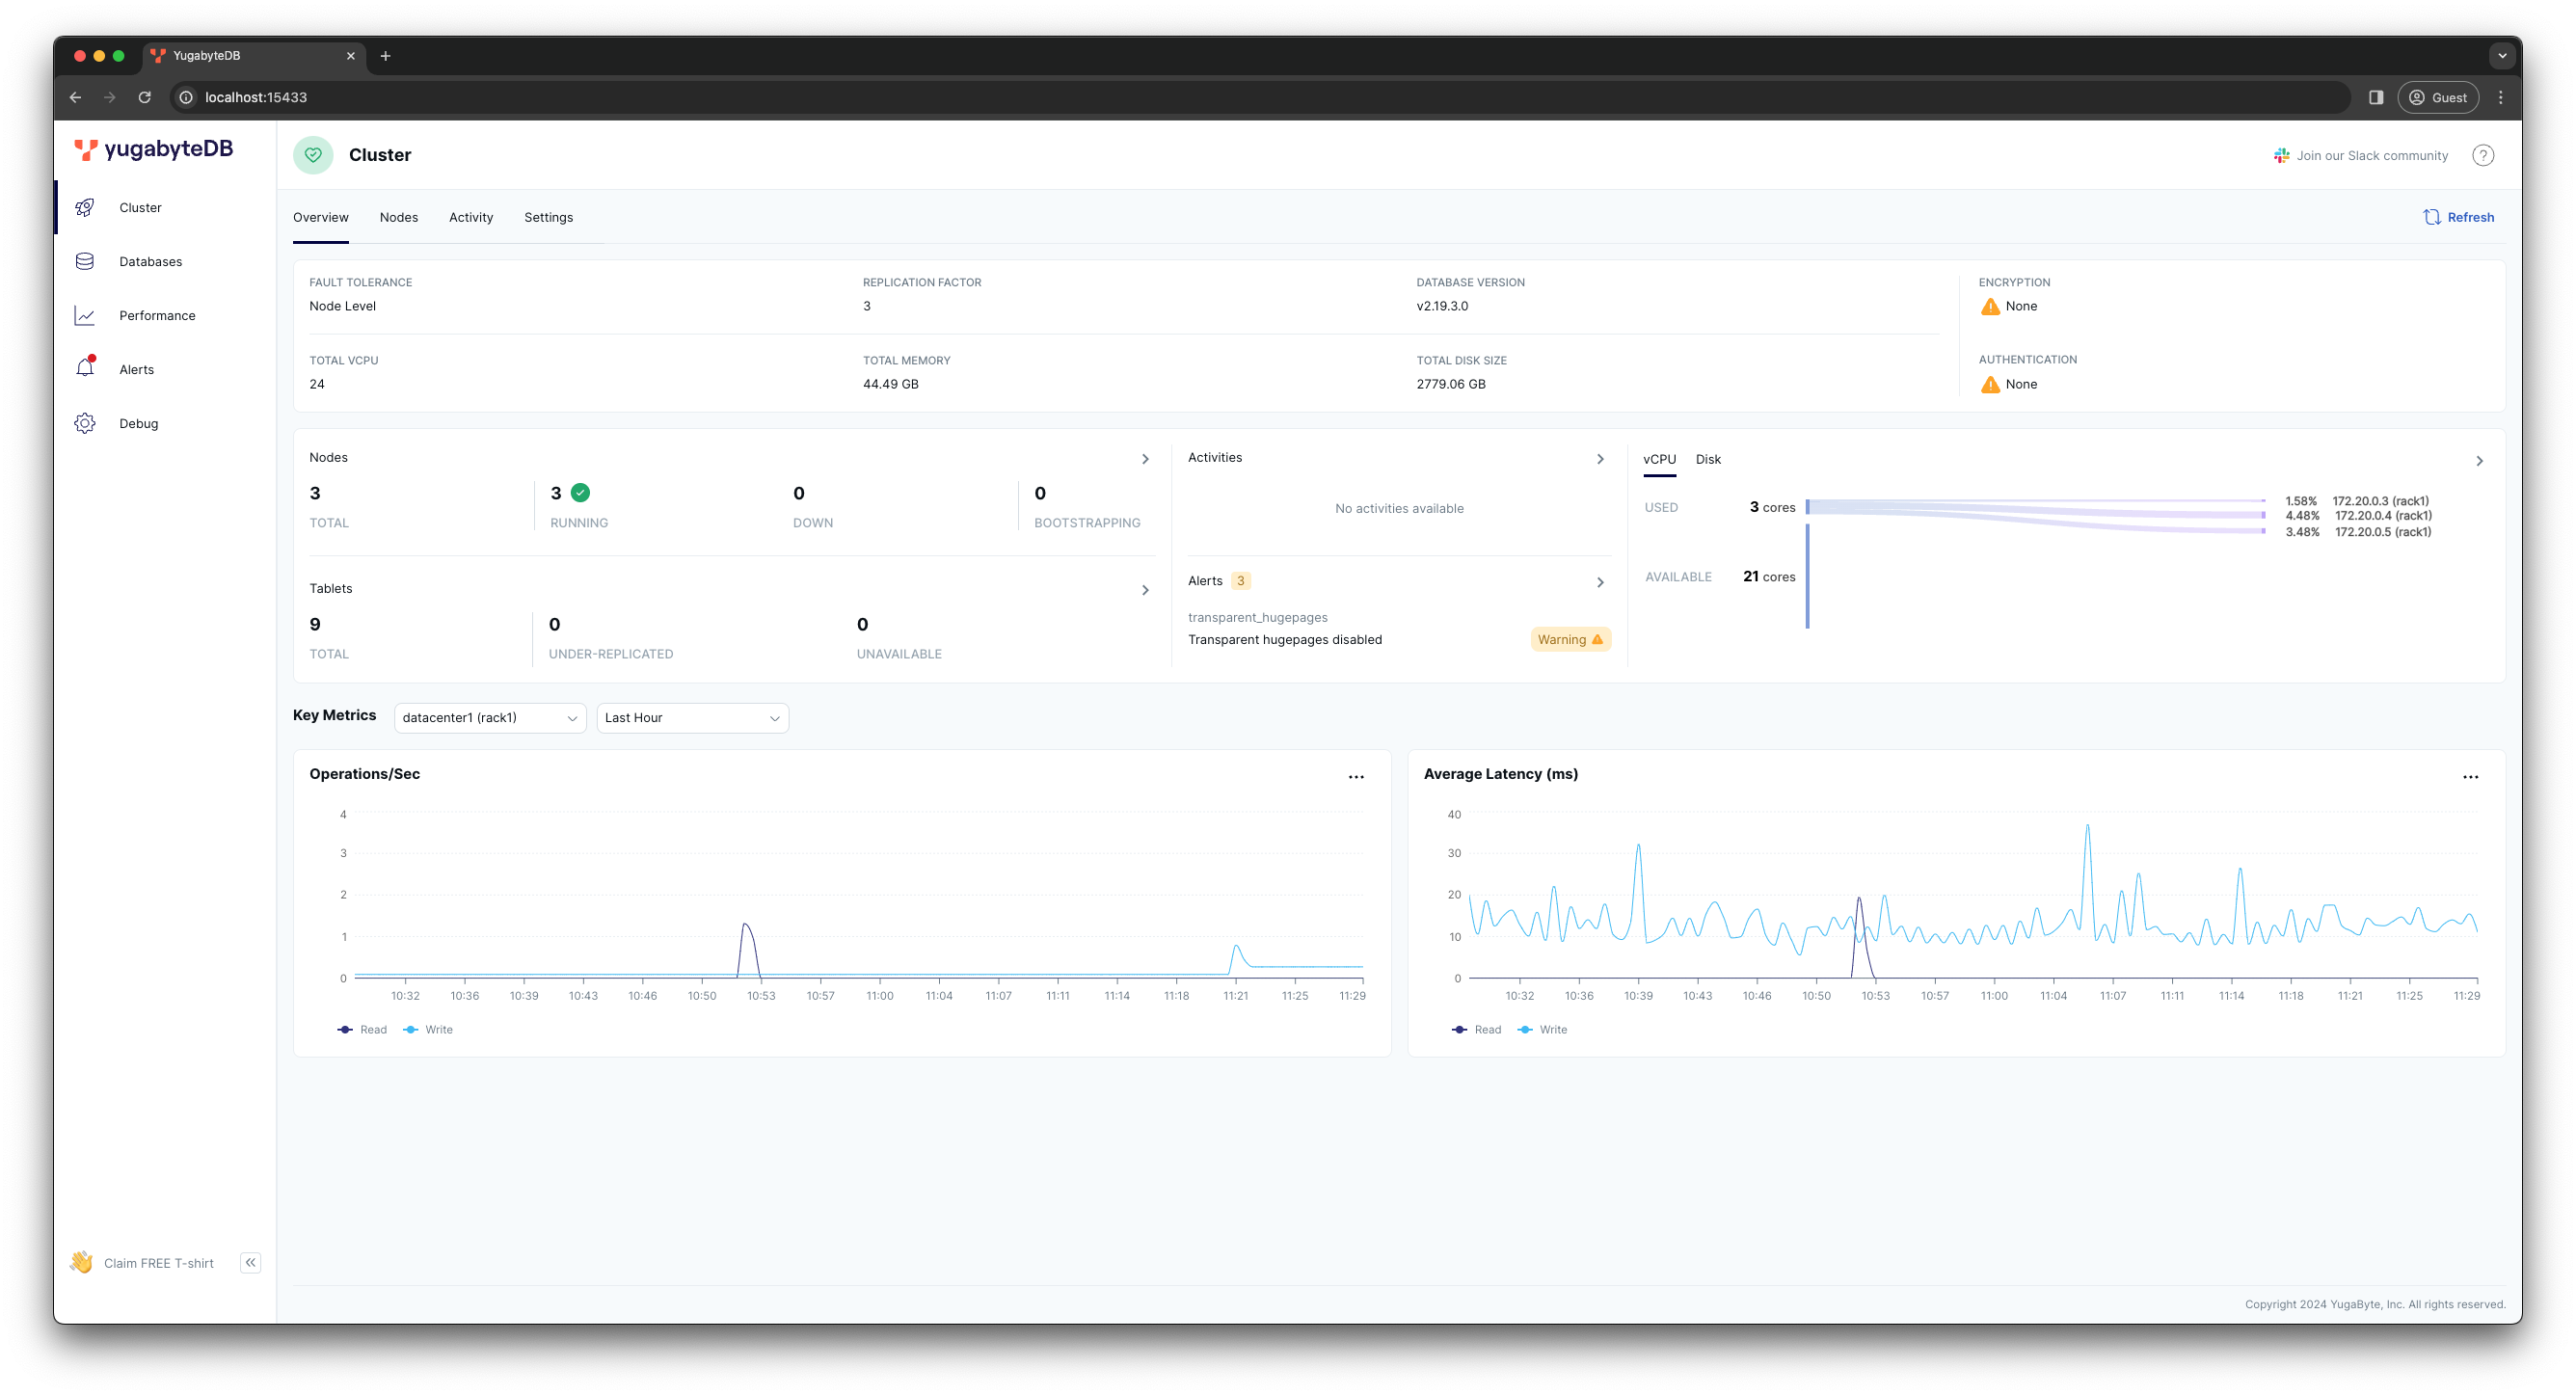
Upon checking, you'll see that:
- All three nodes are healthy and in the
RUNNINGstate. - The replication factor has been changed to
3, indicating that now each node maintains a replica of your data that is replicated synchronously with the Raft consensus protocol. This configuration allows your database deployment to tolerate the outage of one node without losing availability or compromising data consistency.
To view more detailed information about the cluster nodes, go to the Nodes dashboard at http://localhost:15433/?tab=tabNodes.
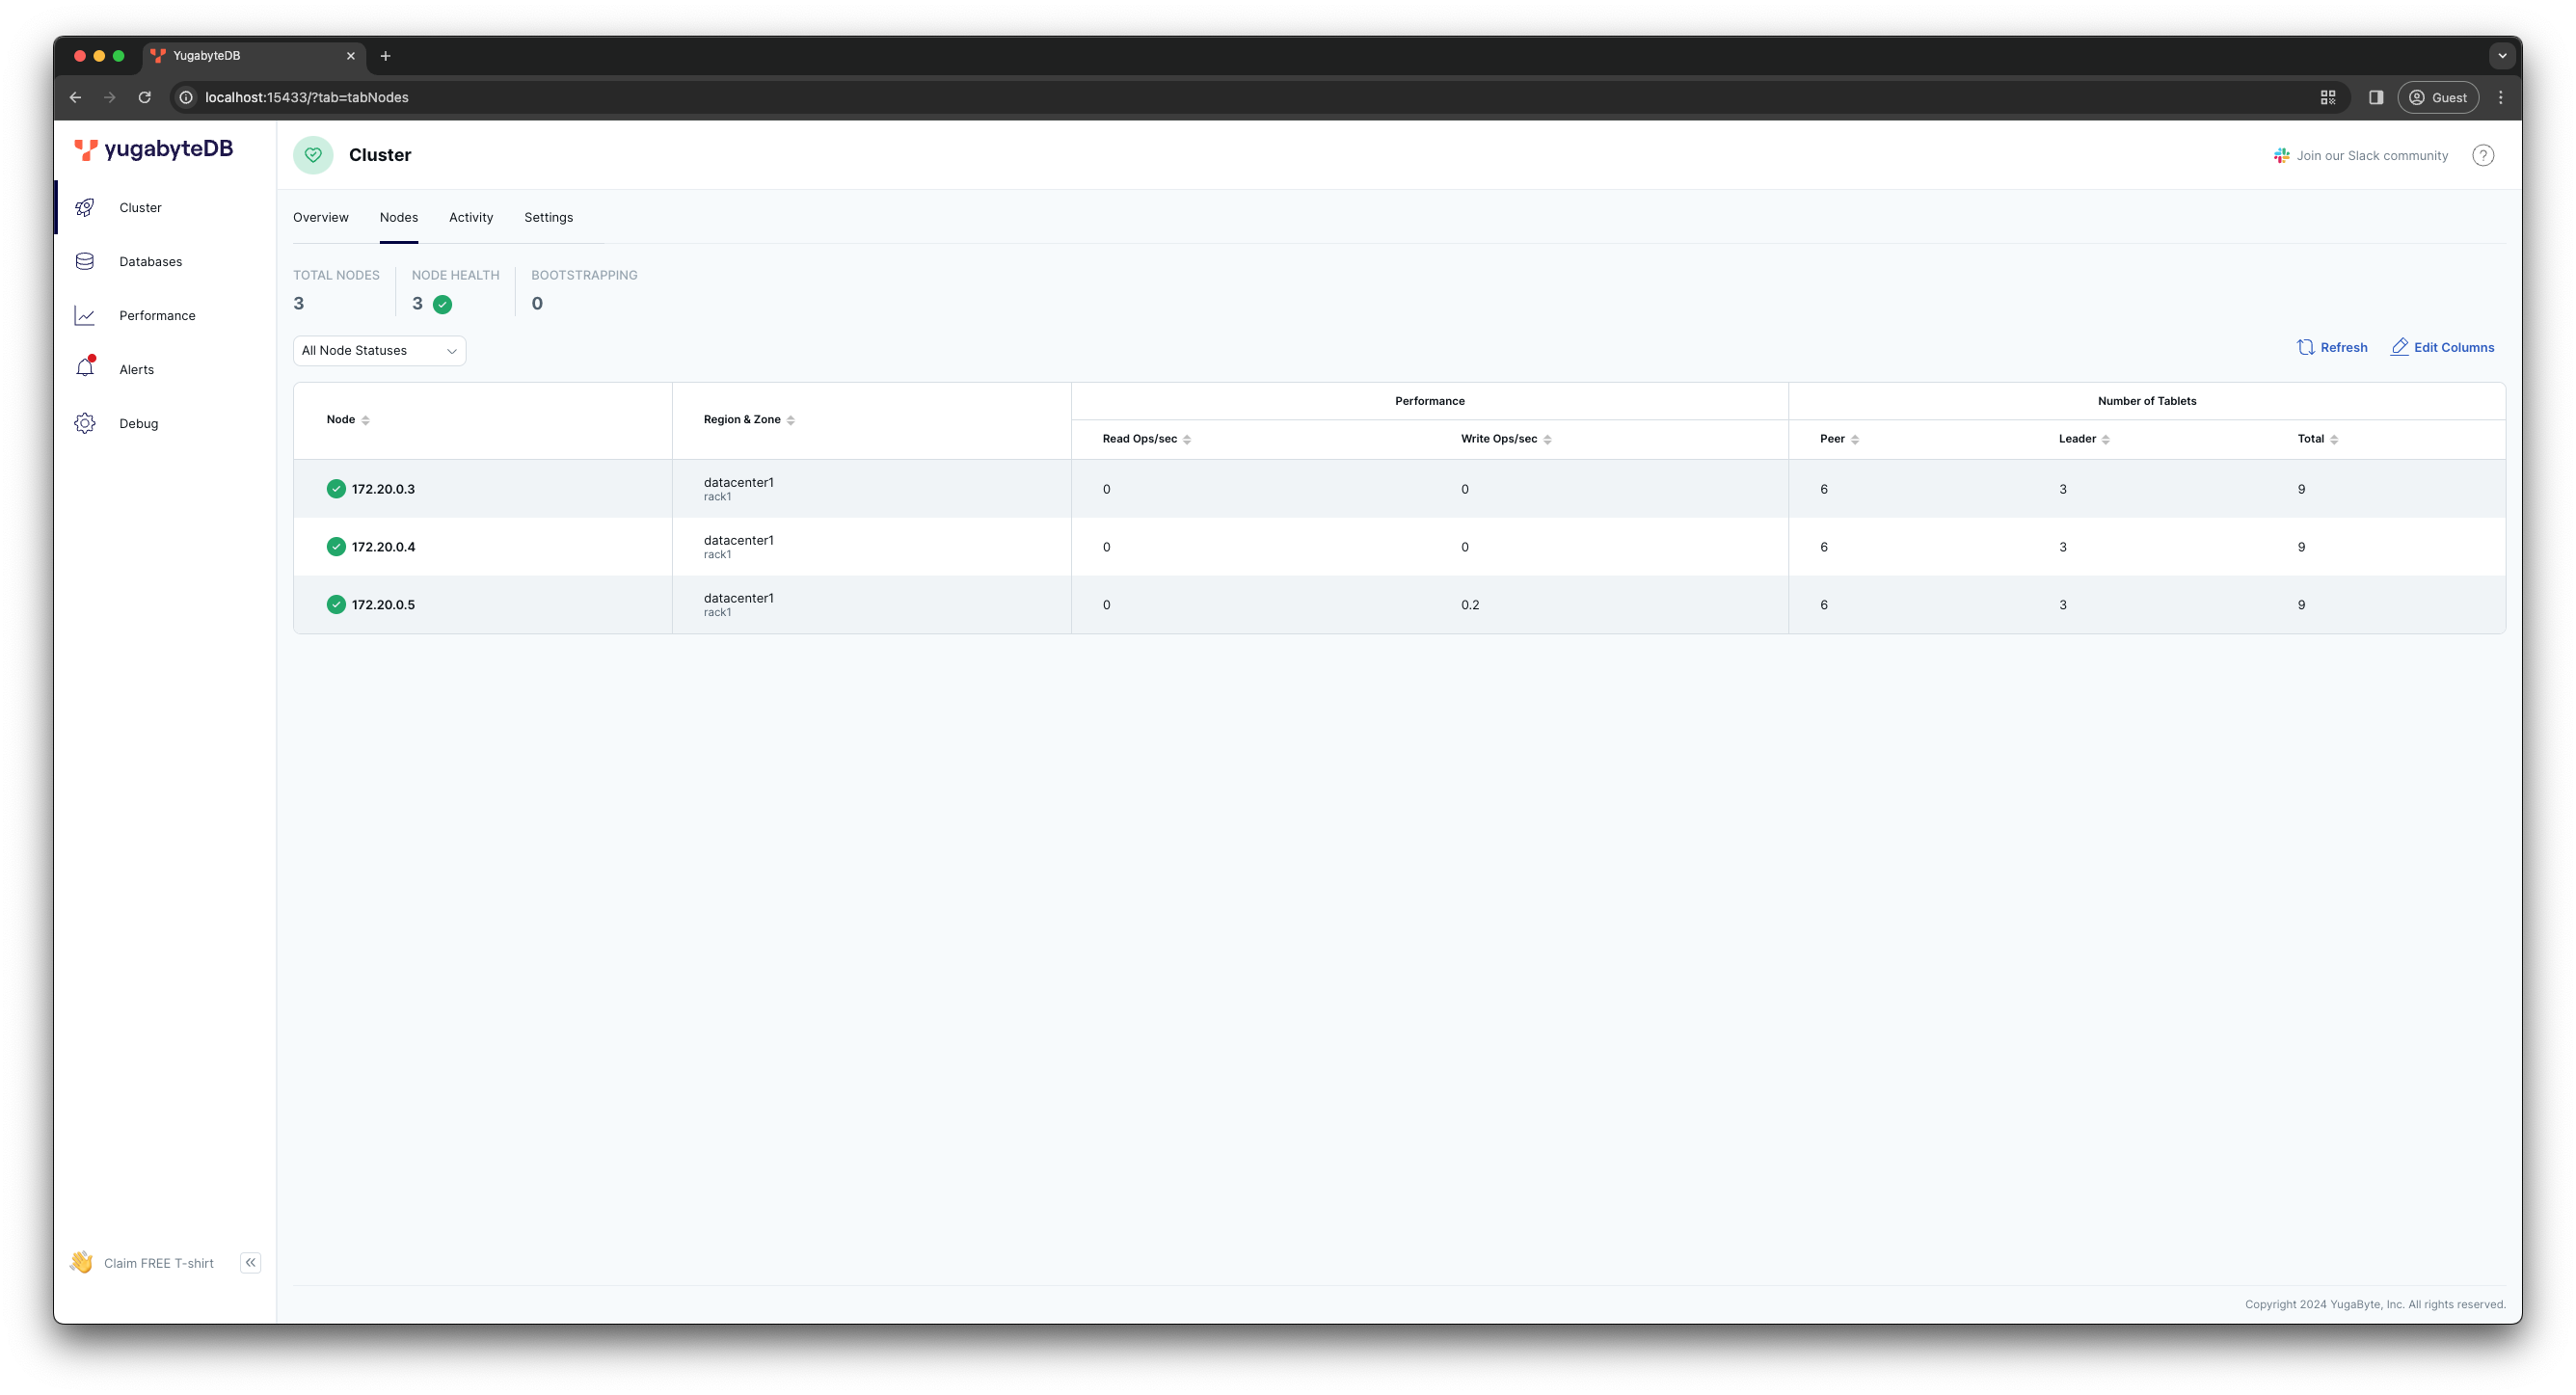
The Number of Tablets column provides insights into how YugabyteDB distributes data and workload.
-
Tablets - YugabyteDB shards your data by splitting tables into tablets, which are then distributed across the cluster nodes. Currently, the cluster splits system-level tables into
9tablets (see the Total column). -
Tablet Leaders and Peers - each tablet comprises of a tablet leader and set of tablet peers, each of which stores one copy of the data belonging to the tablet. There are as many leaders and peers for a tablet as the replication factor, and they form a Raft group. The tablet leaders are responsible for processing read/write requests that require the data belonging to the tablet. By distributed tablet leaders across the cluster, YugabyteDB is capable of scaling your data and read/write workloads.
In your case, the replication factor is 3 and there are 9 tablets in total. Each tablet has 1 leader and 2 peers.
The tablet leaders are evenly distributed across all the nodes (see the Leader column which is 3 for every node). Plus, every node is a peer for a table it's not the leader for, which brings the total number of Peers to 6 on every node.
Therefore, with an RF of 3, you have:
9tablets in total; with9leaders (because a tablet can have only one leader); and18peers (as each tablet is replicated twice, aligning with RF=3).
Switch YugaPlus to YugabyteDB
Now, you're ready to switch the application from PostgreSQL to YugabyteDB.
All you need to do is to restart the application containers with YugabyteDB-specific connectivity settings:
-
Use
Ctrl+Cor{yugaplus-project-dir}/docker-compose stopto stop the application containers. -
Open the
{yugaplus-project-dir}/docker-compose.yamlfile and update the following connectivity settings:- DB_URL=jdbc:postgresql://yugabytedb-node1:5433/yugabyte - DB_USER=yugabyte - DB_PASSWORD=yugabyteFlyway and Advisory Locks
If you use YugabyteDB 2.20.1 or later, then set the
DB_CONN_INIT_SQLvariable in thedocker-compose.yamlfile to the following value:- DB_CONN_INIT_SQL=SET yb_silence_advisory_locks_not_supported_error=trueThe application uses Flyway to apply database migrations on startup. Flyway will try to acquire the PostgreSQL advisory locks that are not presently supported by YugabyteDB. You can use Flyway with YugabyteDB even without this type of lock. The version of YugabyteDB is displayed in the UI at http://localhost:15433/.
-
Start the application:
docker-compose up
This time, the yugaplus-backend container connects to YugabyteDB, which listens on port 5433. Given YugabyteDB's feature and runtime compatibility with PostgreSQL, the container continues using the PostgreSQL JDBC driver (DB_URL=jdbc:postgresql://...), the pgvector extension, and other libraries and frameworks created for PostgreSQL.
Upon establishing a successful connection, the backend uses Flyway to execute database migrations:
2024-02-12T17:10:03.140Z  INFO 1 --- [           main] o.f.c.i.s.DefaultSqlScriptExecutor       : DB: making create index for table "flyway_schema_history" nonconcurrent
2024-02-12T17:10:03.143Z  INFO 1 --- [           main] o.f.core.internal.command.DbMigrate      : Current version of schema "public": << Empty Schema >>
2024-02-12T17:10:03.143Z  INFO 1 --- [           main] o.f.core.internal.command.DbMigrate      : Migrating schema "public" to version "1 - enable pgvector"
2024-02-12T17:10:07.745Z  INFO 1 --- [           main] o.f.core.internal.command.DbMigrate      : Migrating schema "public" to version "1.1 - create movie table"
2024-02-12T17:10:07.794Z  INFO 1 --- [           main] o.f.c.i.s.DefaultSqlScriptExecutor       : DB: table "movie" does not exist, skipping
2024-02-12T17:10:14.164Z  INFO 1 --- [           main] o.f.core.internal.command.DbMigrate      : Migrating schema "public" to version "1.2 - load movie dataset with embeddings"
2024-02-12T17:10:27.642Z  INFO 1 --- [           main] o.f.core.internal.command.DbMigrate      : Migrating schema "public" to version "1.3 - create user table"
2024-02-12T17:10:27.669Z  INFO 1 --- [           main] o.f.c.i.s.DefaultSqlScriptExecutor       : DB: table "user_account" does not exist, skipping
2024-02-12T17:10:30.679Z  INFO 1 --- [           main] o.f.core.internal.command.DbMigrate      : Migrating schema "public" to version "1.4 - create user library table"
2024-02-12T17:10:30.758Z  INFO 1 --- [           main] o.f.c.i.s.DefaultSqlScriptExecutor       : DB: table "user_library" does not exist, skipping
2024-02-12T17:10:38.463Z  INFO 1 --- [           main] o.f.core.internal.command.DbMigrate      : Successfully applied 5 migrations to schema "public", now at version v1.4 (execution time 00:30.066s)
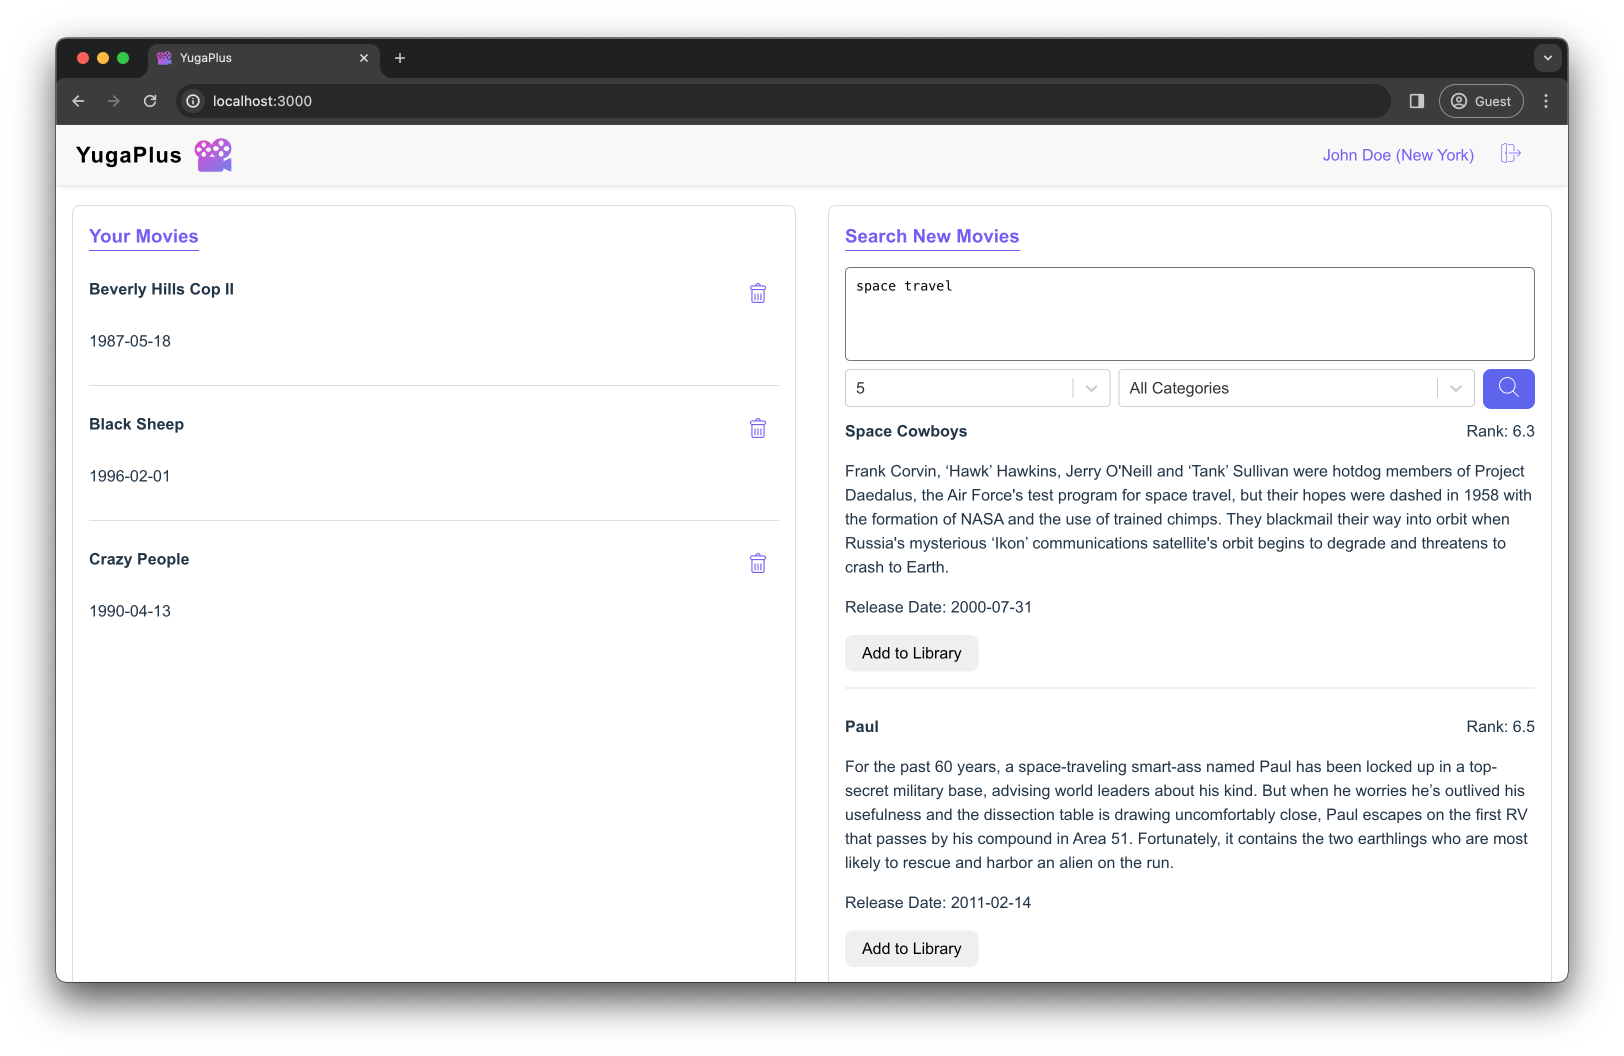
After the schema is created and data is loaded, refresh the YugaPlus UI and sign in one more time at http://localhost:3000/login.

Search for movie recommendations:
space travel
This time the full-text search happens over a distributed YugabyteDB cluster:
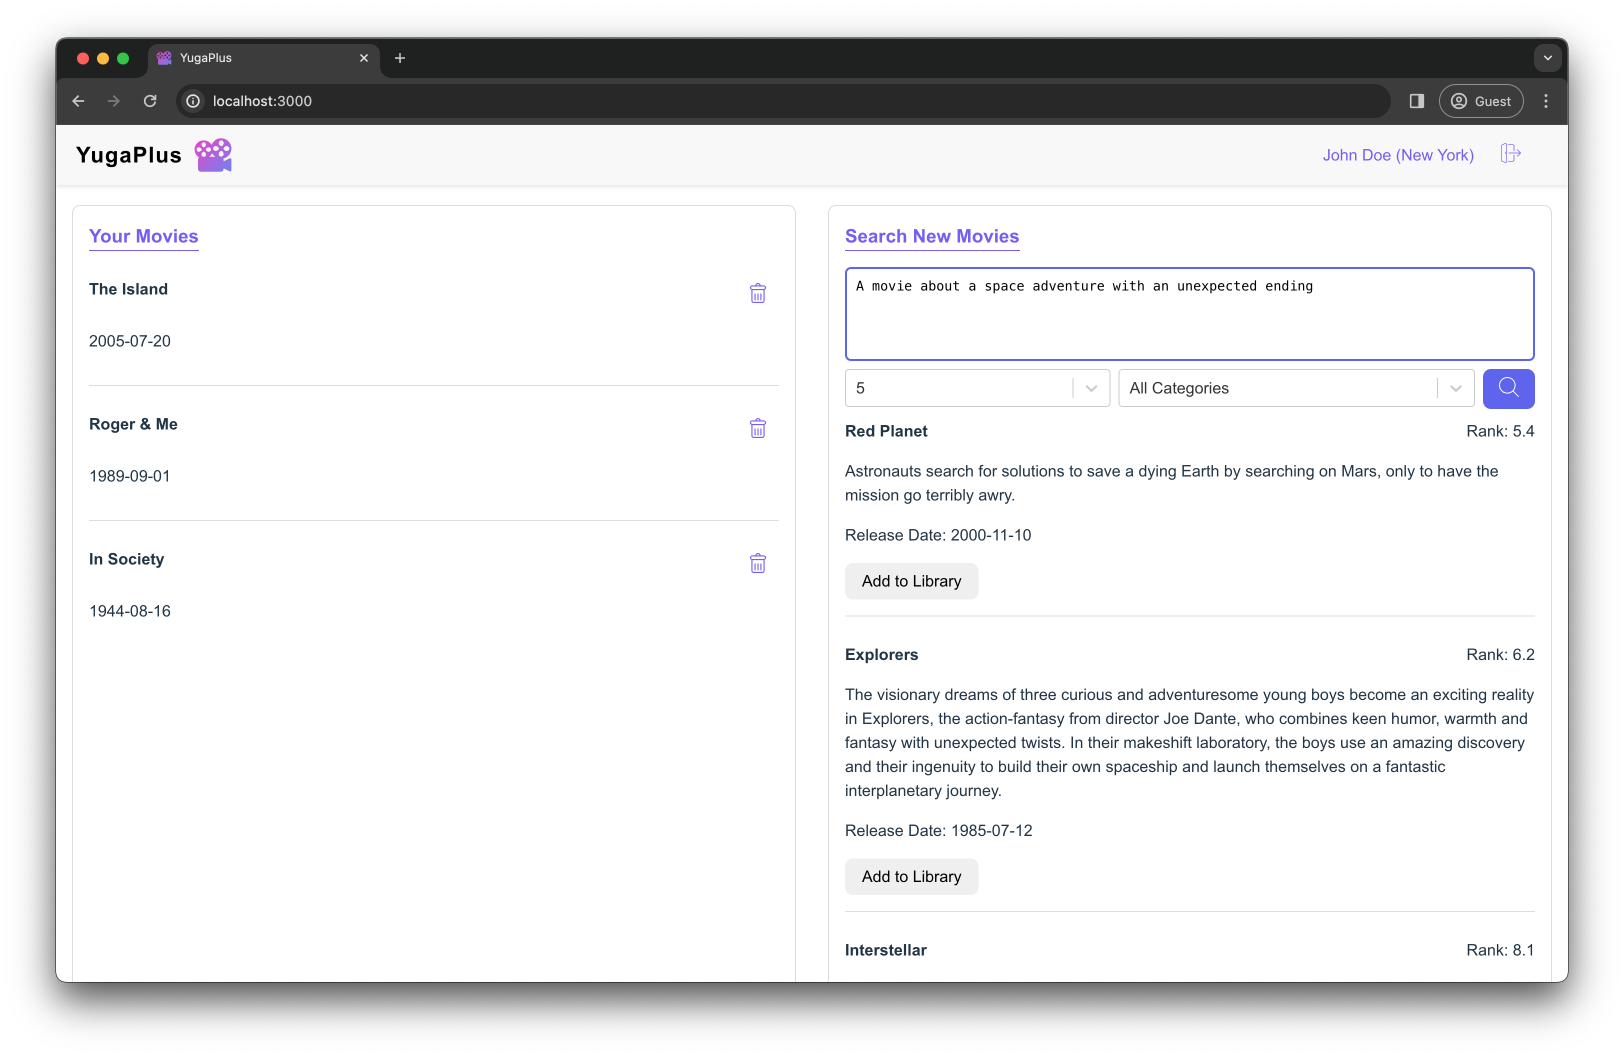
A movie about a space adventure with an unexpected ending
This time the vector similarity search happens over a distributed YugabyteDB cluster using the same PostgreSQL pgvector extension.
Congratulations, you've finished Chapter 2! You've successfully deployed a multi-node YugabyteDB cluster and transitioned the YugaPlus movie recommendations service to this distributed database without any code changes.
The application leveraged YugabyteDB's feature and runtime compatibility with PostgreSQL, continuing to utilize the libraries, drivers, frameworks, and extensions originally designed for PostgreSQL.
Moving on to Chapter 3, where you'll learn how to tolerate outages even in the event of major incidents in the cloud.